This instruction will show you how to calculate and evaluate the risk priority number for an FMEA document with FMEA Studio.
1. Setting up a Column for RPN calculation
If your template already has an RPN, you can ignore this section and go directly to section 2.
- Insert a new column.
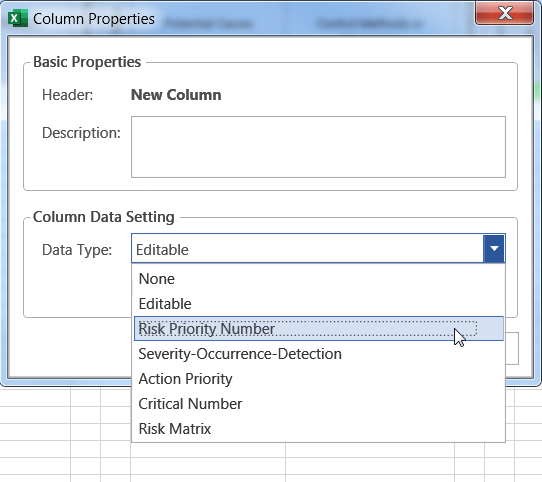
- Righ-click on the new column header, then select Column Properties.

- Under Column Data Type setting, select Risk Priority Number from the Data Type combo box. (The default data type of a new column is Editable)

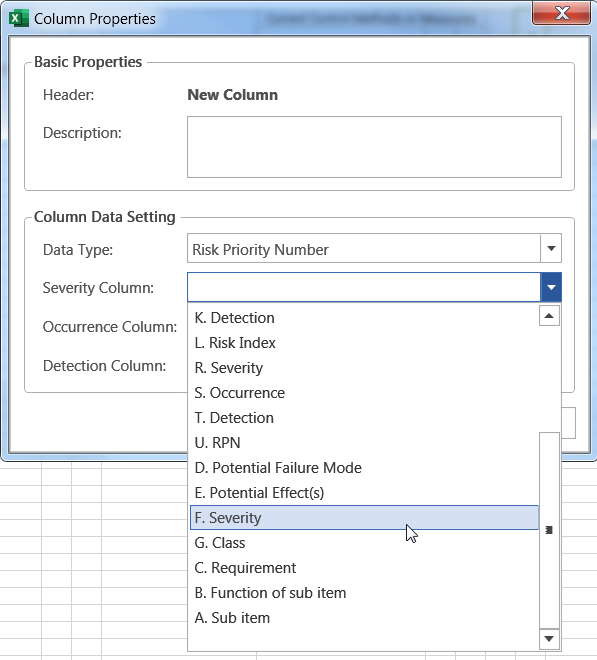
- In the Severity Column combo box, select a column. This column should hold the severity index value. In the following picture, in F. Severity, F is the Excel column address, and Severity is the label of the header of the selected column.

- In the Occurrence Column combo box, select a column. This column should hold the occurrence index value.
- In the Detection Column combo box, select a column. This column should hold the detection index value.
- Click OK to apply and close the Column Properties dialog box.

2. RPN evaluation setting
After RPN calculation, the RPN should be used to prioritize high-risk issues and determine the requirement for corrective action. Except you have an internal rule for prioritizing or considering case by case, the other two options are Top priority and Setting a threshold.
- Select Risk Priority Number from the Risk Evaluation Setting menu from the FMEA Studio tab.

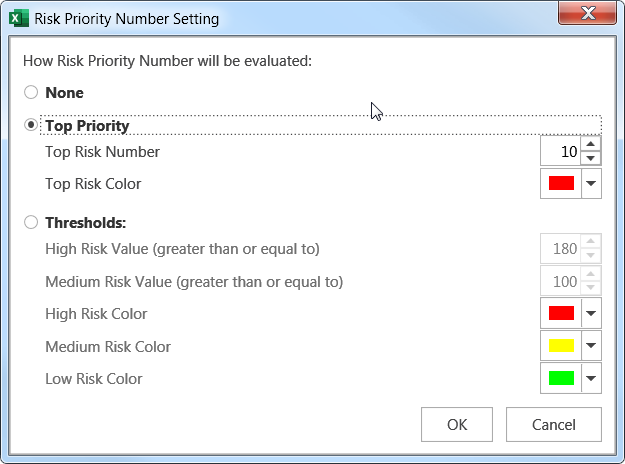
- Risk Priority Number Setting dialog box shows up as below.

This dialog box allows you to set up how the RPN will be evaluated- None: Select this if you don’t want to evaluate the Risk Priority Number. FMEA Studio only calculates RPN without any highlight color.
- Top Priority: Select this radio box to evaluate RPN with Top priority.
- Top Risk Number: The number of the risk items to be prioritized.
- Top Risk Color: The color will highlight the top priority risk items.
- Thresholds: Select this radio box if you want to evaluate RPN with Thresholds.
- High Risk Value: Chose the high-risk threshold value. Any risk item that has RPN greater than or equal to this value will be highlighted as high risk.
- Medium Risk Value: Chose the medium risk threshold value. Any risk item that has RPN greater than or equal to this value and lower than High Risk Value will be highlighted as medium risk.
- High Risk Color: Chose the color for the high-risk items.
- Medium Risk Color: Chose the color for the medium-risk items.
- Low-Risk Color: Chose the color for the low-risk items.
- After setting, click OK to save and close the Risk Priority Number Setting dialog box.