FMEA Studio can create AIAG PFMEA as a single document or in a document package with a linked Process Flow Chart (Diagram) and Process Control Plan
1. Select a template
Open the FMEA Studio tab inside Excel, select New Document, then select New Process FMEA (AIAG) or New PFMEA Package (AIAG), depending on whether you want to create PFMEA as an independent document or a dependent document in a document package with linked PFD and PCP.
If you have a custom template for AIAG PFMEA that you saved before, you can create a new PFMEA document with it: File -> New -> Select your custom template.
2. Input PFMEA header
In the PFMEA template header, you can input the basic information of the PFMEA project (process, model, core team, date,…). The built-in template has some basic elements. You can also add more custom elements or remove any element you don’t want to use.

2.1. Basic PFMEA header elements
The built-in PFMEA template’s header has the following elements:
- Process/Product: name and number of the process item being analyzed. Examples: Ballpoint pen assembly and Ballpoint pen tip manufacturing.
- Model/Project: name or codename of the model/project) to define the specific product model/project affected by the analysis.
- Process Responsibility: person, team, department, and(or) organization who has main responsibility for process design and development.
- Core Team: names (contact info) of team members involved in developing PFMEA. Team members of PFMEA come from many departments (functions), not just process design. For example, product design, quality, supplier quality engineer, logistics,…
- Created By: name (and contact info) of the person (generally in the process design team) who created the PFMEA document.
- Approved By: name (and contact info) of the person who approved and released the revision of the PFMEA document.
- FMEA No.: control number of the PFMEA document
- Rev: revision number of the PFMEA document
- Date: the date that the revision PFMEA is approved and released.
2.2. Custom PFMEA header
If you might want to add or remove items in the PFMEA header of the template, you can edit the header as any other native Excel worksheet. More detailed instructions for customizing an FMEA template can be found here.
3. Two methods of filling content
FMEA Studio allows you to fill the content in a PFMEA by two methods: worksheet or using the Structure Tree diagram.
Note: Structure Tree diagram only available in Pro edition.
3.1 PFMEA Worksheet
You can input the content directly and use right-click menu to insert new items or delete unused items.
Edit an item
Most of the cell of the AIAG PFMEA template is editable directly, you can double click on the cell of the item and edit it directly. Or right-click and select Edit from right-click menu.
- Double click on the process step (or right-click and select Edit from right-click menu) and enter the process step content.

- Then you can edit the cell content
- Or you can double click to select the cell to edit its content

Delete an item
To delete an item from the PFMEA worksheet, right-click on the item you want to delete and select Delete from the right-click menu. The item and its row will be deleted, all same and lower level items will be deleted also.

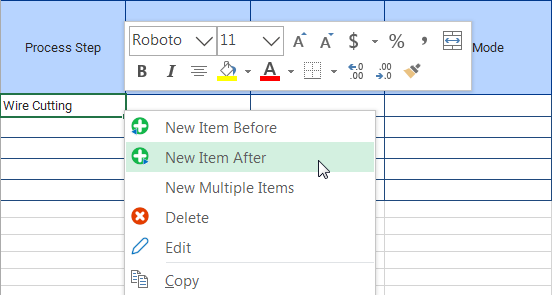
Insert New Item
- Right-click on the item where you want to insert a new item, then select New Item Before or New Item After, depending on the position of the new item.

- New line will be inserted with new item below (or above) the selected item.
- Then you can enter new item content.
Insert Multiple Items
If you want to insert multiple Items at a time, please select the menu New Multiple Items. A dialog box will be displayed, then you can select how many items you want to insert before or after the selected item.

Note:
If you are using PFMEA inside a document package with a linked Process Flow Chart and Control Plan, any change in the Process Step column in PFMEA will be reflected in the corresponding column in the Process Flow Chart and Control Plan.
3.2. Using Diagram
You can also use a Structure tree diagram to edit the main items of AIAG PFMEA, such as Process Step, Function, Requirement, Failure Mode and Failure Cause. The change made by the Structure Tree diagram is also reflected in the worksheet.
Open and display structure tree
To open the Structure Tree diagram, click the button Structure Tree in the FMEA Studio tab.

To display the structure of the item you want, select it. For example, to display the structure tree of a process step, select it in the worksheet.
With structure tree, you navigate to the item by using the toolbar at the top-left corner of the Structure Tree task pane or.

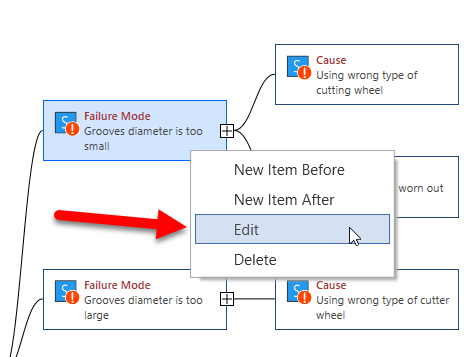
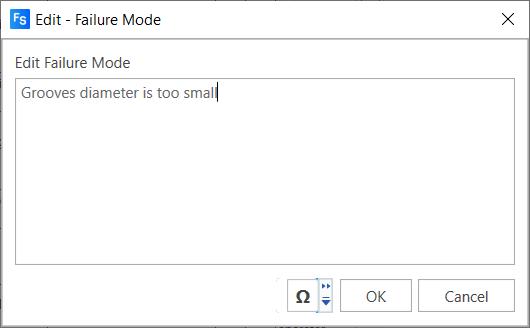
Edit an item with a structure tree
To edit an item, follow the steps:
- In the structure tree diagram, right-click on the item you want to edit and select Edit

- A dialog appears and allows you to edit the content of the item.

- Click OK to save or Cancel to cancel the change.
Delete an item
To delete an item from the structure diagram, right-click on the item you want to delete and select Delete from the right-click menu.
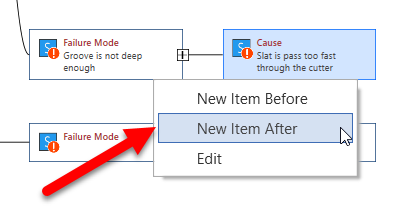
Insert a new item
- In the structure tree diagram, right-click on the item where you want to insert a new item, then select New Item Before or New Item After, depending on the position of the new item.

- The New item dialog displays, allowing you to enter new item content.

- After entering new item content, click OK to save.

4. Select Severity, Occurrence and Detection
There are three ways to select or input Severity, Occurrence and Detection rating for the PFMEA.
4.1. Input directly into the worksheet
You can input the rating number of the Severity, Occurrence and Detection directly in the cell of the corresponding item.
4.2. Select rating from right-click menu
Right-click the item cell and select Insert Ranking, then select the appropriate rating from the drop-down menu.

4.3. Select a rating from the dialog
Double click the item cell and select the appropriate rating from the list

5. RPN calculation and evaluation
5.1. RPN calculation
RPN is automatically calculated in the RPN column. The value of RPN will be automatically calculated when you finish input (or select) rating of the Severity column, Occurrence column and Detection column.

Note: to change the column of Severity, Occurrence and Detection or formula of RPN, use Column Properties by right-clicking the column header and selecting Column Properties.
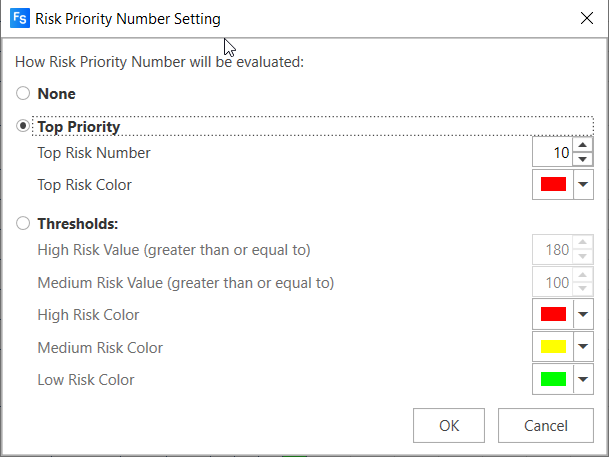
5.2. RPN evaluation
FMEA Studio supports two methods of evaluation of RPN: Thresholds and Top Priority
Here are steps to set up the RPN evaluation:
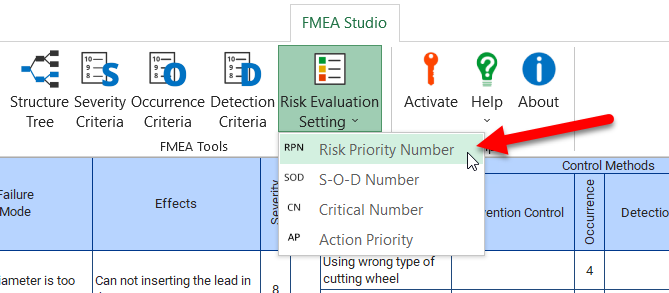
- In the FMEA Studio tab, click Risk Evaluation Setting, then select Risk Priority Number from the drop-down menu.

- Risk Priority Number Setting dialog appears, then select Top Priority if you want to highlight the top risk in the PFMEA. Top Risk Number allows you to select how many items to highlight, and Top Risk Color allows you to select the highlight color.

- Select Thresholds if you want to set thresholds for high risk, medium risk and low risk. Then you can select thresholds and corresponding colors.